


How many guides should go on a rod, how far apart, and why are the first ones so large when the last are tiny? This is the question that stalls most first builds, and it is also the one with the fewest clear answers online.
The good news is that the subject is far better mapped than it looks. There is physical logic behind how a guide train is laid out, and ready-made specifications that spare you from recalculating it. If you have not chosen your guides yet, our comparison of ceramics and frames covers that step first.
A guide train has three mechanical jobs, and spacing acts on all three at once.
It channels the line coming off the reel. In spinning, line leaves the spool as a spiral far wider than the blank: this is loop expansion. Until that spiral is brought into the axis, it rubs against the guides and you lose distance on every cast.
It then spreads the load of the fight. The more guides there are and the closer together they sit, the more the line follows the blank's real curve instead of cutting it into straight segments. A train that is too sparse creates hard spots, and the rod does not work along its whole length.
Finally it transmits vibration. Each guide is a contact point between line and blank. The more there are, the more information travels back, provided they stay light: that is the whole trade-off in the upper section of the rod, where weight penalises the action.
A modern guide train reads as two distinct parts, which share neither the same role nor the same guides.
The reduction cone
These are the first guides after the reel seat, the largest and the tallest on the foot. Their job is to catch the spiral of line coming off the spool and bring it back towards the blank axis, as fast as possible. It is called a reduction because their diameter drops rapidly from one guide to the next.
The running section
These are all the following guides, through to the tip. The line already runs in the axis there, so they no longer have to channel it: they accompany it as close to the blank as possible. They are therefore small, low on the foot, light, and more numerous than on older builds.
The classic beginner's mistake is to treat the train as a steady progression, reducing guide size little by little from butt to tip. A modern train does the opposite: it reduces abruptly over three or four guides, then barely changes at all.
In 1995, Fuji formalised the New Guide Concept, a study of the number, shape, size and placement of guides. Its main novelty: increase the number of guides on the tip section while reducing their size. The gains showed in distance, accuracy and how well the blank's power was used.
In 2012, the KR Concept pushed that logic further, in response to a change in use: braid becoming standard. Braid expands more than monofilament and tangles more easily, particularly in a crosswind. A train capable of bringing it into line faster was needed.
The answer has two parts. First a forced reduction: instead of spreading the decrease out, it is completed over three or four guides, forcing the angle relative to the reel axis. Then reduction cone guides that sit taller on the foot, holding the line away from the blank and limiting friction through that phase. The shape of the K series, with its double slope, completes the setup by bringing braid back to the centre of the guide instead of letting it wrap around the foot.
There is no universal number, because it depends on blank length, blank power and build type. A few benchmarks nonetheless hold across the great majority of casting rods.
- The reduction cone runs to three guides on a short rod, four beyond around 7 foot 6.
- The first guide is the largest in the train, and its size depends directly on the spool diameter of the reel you intend to fit.
- The running section then holds between five and eight guides depending on length, all of identical size or close to it.
- Spacing tightens towards the tip, typically from around twenty centimetres after the cone down to around ten near the point.
Hold on to the principle rather than the figures. Adding a guide to the running section increases contact points and therefore sensitivity, at the cost of a little weight at the tip. Removing one does the reverse. That is the only dial you really have to set.
For a first rod, the fast route is to calculate nothing at all. Fuji publishes build specifications that give, for a set blank length and power, the number of guides, their size and their exact position.
They are read right to left, starting from the tip guide. The figures above the blank give the distances between guides, those below the ring sizes. On a 7 foot, that gives for example a first running guide 10.5 cm from the tip, then 10.5, 11, 11.5, 12.5, 13.5, 15, 17 and 23 cm.
Plenty of builds go wrong on this point: the stated distance is measured between rings, not between feet. On the large guides of the cone, the gap between the two reference points easily exceeds a centimetre, and a train measured at the feet ends up offset along its whole length.
These specifications are not approximations: they come from Fuji, they are proven, and a build that follows them works. You can depart from them later, once you know why.
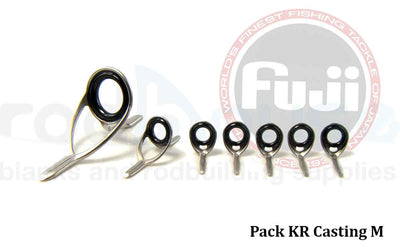
A pack gathers all the guides of a complete train, cone and running section, in the sizes and quantities matching a given specification. It is what we recommend for a first build, and what many experienced builders keep using.
Three pieces of information are enough to choose: blank length, blank power, and build type. Spinning packs and casting packs then come in power bands, from UL to XH.
One piece of advice from our builders, which comes up every time: take the pack matching the upper power of your blank. On a blank rated 2 to 12 grams, go for the pack above. Power dictates the line diameter you will use, and a pack that is too light gives you guides your leader knot will catch in.
The tip guide is not part of the pack in the same way as the others: it is chosen on the real dimensions of your blank, and a mistake here is costly.
Two measurements define it. The ring size, in millimetres, which generally matches the smallest running guide. And the inner diameter of the tube, the part that caps the point of the blank: that is the critical measurement, taken with callipers on the bare blank, around 1.3 cm below the point.
On a Fuji tip guide, the size reads as 4.5 to 1.8: a 4.5 mm ring, a tube of 1.8 mm inner diameter. If your measurement falls between two tube sizes, always take the larger. A slightly wide tube leaves room for glue; a tube that is too tight forces on the carbon and splits the tip. The tip guide range is sorted by fishing discipline and by size.
Once the logic is clear, two adjustments come up often.
On rods over 7 foot 6, taking the reduction cone from three guides to four improves casting distance: the spiral of line has further to travel before it is in the axis, and an extra guide brings it there more gradually without a hard spot.
Adding a guide to the running section increases contact points and therefore feedback. It is an adjustment that earns its place in fishing where detection comes first, provided you accept the extra gram.
In both cases the call is made rod in hand, not on paper. And if you are building on a Fuji base, the full series range lets you stay consistent across the whole train, from cone to running section.
Before you reach for the wrapping thread, a dry check saves you from starting over. Set every guide in its place with a simple rubber band, assemble the rod, and look.
Three things get checked at that moment. That the cone's decrease is clean and regular, with no guide standing taller than its neighbours. That the line, threaded through the whole train and put under tension, touches the blank nowhere between two guides. And that the whole thing is aligned, sighting from the butt.
It is also the moment to flex the rod slightly with the line tensioned: if a guide creates a marked angle instead of following the curve, it is in the wrong place. Once that check is passed, you can move on to fitting and wrapping, which has its own tutorial.
And if you are unsure about a train, send us your blank reference and the intended build: we will confirm the layout with you before you order.







Comments
0Log in to leave a comment.
Log in