

Tuto: How to make a Wrapping Ligature
.After seeing how to simply place and ligate a set of rings on your blank, we'll now see how to bring a little cheer, color and whimsy to this little world.
The material.
Here's the list of supplies. Nothing too fancy, if you've already assembled a rod you've got everything in stock:
- scotch tape to form a stop for tying the Wrapping rings - rubber bands to secure the rings - Wrapping wire of different colors and the same diameter - razor blade - a piece of braid loop to finish the Wrapping
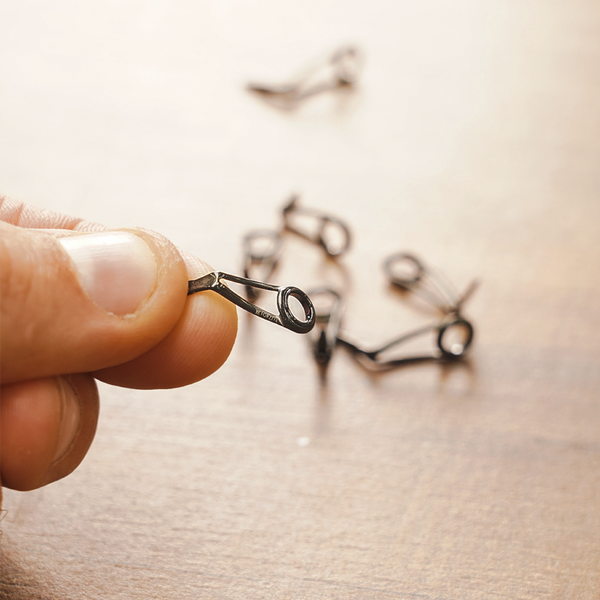
. [caption id="attachment_1303" align="aligncenter" width="640"] The secret to successful Wrapping? A cutter or scalpel blade that cuts VERY VERY well![/caption]
This technique can be used on rings as well as on a simple ligature to finish a sticker, for example. There's nothing very technical or complicated about it, you just need to take your time, be calm and meticulous, and know how to count...
[caption id="attachment_1293" align="aligncenter" width="640"] Difficulty level validated by the IRO (intergalactic organization of rodbuilders ) ;-)[/caption]
To get the hang of it, it's best to start with classic wire in size C or D. Once you've mastered the technique, you can move on to Metallic wire, which is harder to use, and finally finish with size A for light rods.
I should point out that this is not the only technique for making stripes or edgings on your rods. It's simply the one I use and like best.
Let's start with the Wrapping of a ring embellished with two bands and a spiral: a fairly simple decoration but one that gives your rod a hell of a style when well executed. Once you've mastered these techniques, all you have to do is let your creativity do the talking.
Preparing the ring and starting the Wrapping
1: First, we'll position our ring as I explained earlier in this tuto. This way it will be perfectly fixed to the blank and won't slip off when the Wrapping starts.
2: We attack our Wrapping as close to the ring as possible. This allows us to make shorter Wrappings, which saves weight, and is also aesthetically pleasing in my opinion.
3: As soon as the wire overlaps the ring tab, we cut a 40cm piece of colored wire (to be adapted to your ligature). We place our orange-colored wire under a turn of black wire under tension. I always place it behind the ring lug to ensure a clean finish - we'll see why later. I always work with the black wire under tension and with the colored wire free, but which will be tensioned by hand on certain phases. We secure the orange wire with a few windings.
4: We cut the orange wire flush then pull it slightly so that it passes under the black turns.
[caption id="attachment_1294" align="aligncenter" width="635"] Preparing the ring before wrapping is important. the most important thing is that it's securely attached to the blank![/caption]
Making the first band
1: Once our wire is secure, we can attack our first strip. To do this, I shift the black wire slightly to the left.
2: I take the orange wire in my hand and once tensioned I straddle the black wire.
3: Keeping the orange wire taut and in my hand I go around the blank, here I chose to do two turns, it also works with one or several, it's up to you. It may happen that your hand-made orange thread wraps come up on the Wrapping or overlap. In this case, we undo them quietly and start again at the beginning of 2.
4: Once my band is complete I keep the orange thread under tension and shift my black thread to the right again. You can see here that my orange wire, which will be covered by the black wire, has passed in front of the ring lug. Starting the band behind the lug and finishing in front of it will give us an ideal finish. In fact, this way, the band or spiral joints will end up on the ring lug. In other words, the least visible part of the rod. These are details that won't stop the rod from fishing, but we're here to enjoy ourselves after all.
.I'm blowing, I'm breathing, everything's going to be fine ...
5: We simply pass our orange line under the black line to help secure it. We keep the orange wire taut, then make at least one blank turn with the black wire to secure everything. Finally, we packe the Wrapping with our fingernail or a burnisher to tighten the turns and avoid seeing the blank underneath. You may notice a small bump on the overlap of the orange wire. Don't panic, a well-placed burnish will smooth it out. Phew, we can breathe a sigh of relief, the first stage is over, it was pretty simple wasn't it?
[caption id="attachment_1295" align="aligncenter" width="635"] Making a strip in a ligature. By following the steps one after the other, it's child's play!
Making the spiral or edging
We're now going to tackle the second part of this tutorial, I've named the spiral, or edging it's up to you. Nothing too complicated either, the biggest difficulty is knowing how to count if you want to obtain a homogeneous result.
1: Once we've completed our first strip, we'll make a few wraps of black thread, the number of which is important. I'm going to start with a number of 4 turns between the completion of my band and the beginning of my spiral.
2: Here's the starting point of the spiral: we pass the orange thread under the black thread.
3: We hold the two wires, the black one on the left and the orange one on the right, taut with our hand and glued together, then begin the blank rotation.
4: Once you've reached the number of blank rotations you want, simply pass the orange wire under the black one, keeping it taut, then secure the whole thing with a turn of the blank. Where the spiral ends is very important. From an aesthetic point of view, I try to finish it as close as possible to the ring leg. If the spiral fails, undo the whole thing and start again at point 2. Once the spiral is complete, pack it again with your fingernail or a burnisher to tighten the turns. Take another deep breath, and it's all done.
[caption id="" align="aligncenter" width="635"] Wrapping, a technique to master to brighten up your Wrappings![/caption]
Making the second band
I'm now going to make a new strip on the same basis as the first.
1: We start our strip in the same way. Don't forget to count the turns between the end of your spiral and the start of your strip. As I made 4 turns of black thread on the first interval, I'll make 4 again for this one. Once we've made our turns of black thread we redo exactly the same technique as for the first strip.
2: Once our band is complete we secure with black thread and make a few wraps.
3: We cut the orange thread flush and continue our wraps of black thread. That's it, the hard part's over, we can relax now.
[caption id="attachment_1297" align="aligncenter" width="635"] But when does it stop ????[/caption]
Finishes
It's time to finish our Wrapping now.
1: A loop of braid is attached under a coil of black wire.
2: We make wraps of black thread up to the ring leg.
3: We pass the black thread through the loop and then pull it slightly so that it passes under the Wrapping for about 1mm.
4: Cut the black thread flush then pull the braid loop at an angle of 45°. Hop our Wrapping is finished ultra cleanly, no unsightly picot or wire to recut.
[caption id="attachment_1298" align="aligncenter" width="635"] Finishing the Wrapping. We're using braid here, but a residue of binding wire also does the job!
Here's our Wrapping on the ring leg side at the start of the ligatures, this will be located under the blank so it won't be very visible.
[caption id="attachment_1299" align="aligncenter" width="272"] Wrapping finished, aperitif?[/caption]
[caption id="attachment_1300" align="aligncenter" width="272"]
 The same ligature but on top of the blank, the result is nicely even.[/caption]
[caption id="attachment_1301" align="aligncenter" width="640"]
The same ligature but on top of the blank, the result is nicely even.[/caption]
[caption id="attachment_1301" align="aligncenter" width="640"] Same type of Wrapping but varnished. I don't know about you, but I like it![/caption]
With a little practice, and a little time, it's pretty simple to make this type of ligature in size A once you've learned the basics, now it's up to you to ligate!
[caption id="attachment_1302" align="aligncenter" width="640"] This type of Wrapping isn't the easiest to make. With practice, however, it's a goal you'll achieve[/caption].


Comments
0Log in to leave a comment.
Log in