

Every fly tyer asks himself the question of the leader when he starts... and even even later...
In the press or on the net, you'll find recipes for knotted leaders, or or knotless "rat tails" in the shops.
A recurring question from many beginners is: "How should I how should I make my leader? I want a leader that allows me to fish to fish nymphs, dry flies, streamers, small rivers, large rivers..."
Let's be clear: there's no such thing as a versatile leader. I have a specific specific leader on my Tightline nymphing rod, I have another type of leader I have another type of leader - available in different lengths depending on the rod and the type of river - for dry and wet fishing. type of river - for dry fly and Sight nymphing.
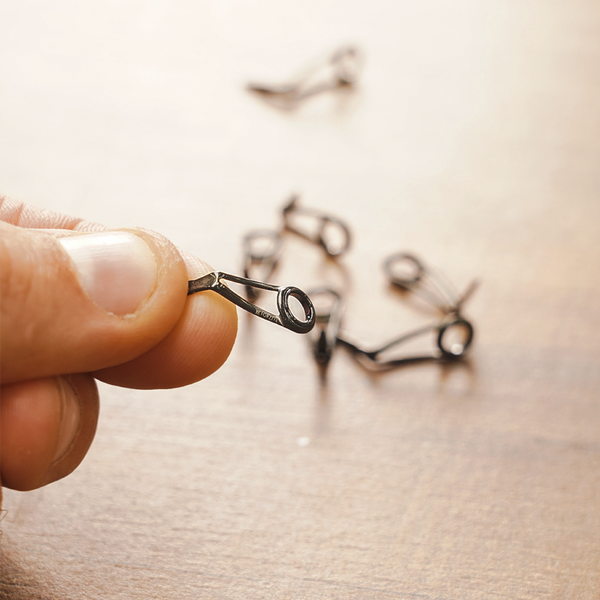
So what I'm proposing is not the versatile leader, but to explain to you how to make your own leaders, without knots, and without memory! Leaders that are easy to lay, that make a great transition between Silk and Fly. The truth is, you could fish with this leader by hand, without rod or fly line... The proof in pictures with a leader of about 2.80 meters :
Not everyone likes knots; they "grate" in the rings. rings. I myself have lost some nice Barbels because of a knot between two strands of my leader, a knot that wouldn't pass the tip ring. tip ring. And let's not forget memory, which is a nightmare for everyone. discretion on the water, and plenty more to say about leader memory... memory...
There's also talk of degressive and progressive footers... There, I'll tell you that it depends on the "angler / rod" combination... It's up to each individual. But this method allows you to make leaders to your taste (tapering, progressive, other...)
So, these line leaders have a name: they're called "furled leaders". In French, we could call them "bas de ligne enroulés" or "bas de ligne torsadés" would be more appropriate. The basic principle is that of rope making, where we play on the force and counter-force of the windings of the strands making up the rope.
.Materials required:

- A drill or a screwdriver. The most important thing is that you can change the direction of rotation!
- A large paper clip (open, with a few wraps of painter's tape on one end)
- A staple swivel
- A few wood hooks
- A few swivels
- A sinker
- A large wooden plank (or two planks for me, tied together with a cable tie)
- And above all, thread... :
- Most furled leaders are made with Fly Assembly thread. I've tried them, and they lay beautifully, delicately and discreetly! But you have to grease them (very) regularly. What I would recommend for fishing with a bamboo rod, an "old school" fiberglass (e-glass) or a very parabolic carbon rod.
- Nylon/fluorocarbon: this is what I use from now on, it gives a slightly faster leader, and corresponds better to carbon or s-glass rods, rods that are quite progressive and a minima "mod-fast".
- Diameter: I use 0.10 mm for my Trout and Grayling fishing. 0.08 or 0.12 mm can also work very well. Even bigger if you want to make one for streamer fishing with a 0.18 or 0.20 mm tip.
<1/ Preparing the work plan plan:
Because sometimes a good diagram is simpler/clearer than long explanations...

Position of two hooks (numbered 1 and 2 on my diagram).
Fitting of dowels in a zig-zag pattern.
Fit a hook (bottom right on my diagram) to which the staple swivel will be threaded. I'm adding two hooks on the sides, just to spread the two strands apart, but it's not mandatory.

The distances between the trunnions are up to you, whether you want them to be degressive or progressive... Personally, I don't even take the measurements any more, I just try to get fairly harmonious distances. D1 about halfway between G1 and G2 / D2 about halfway between G2 and G3... etc.


<2/ Setting up
- Make a loop with its yarn, lay the loop in hook 1

- Pull the thread, and fetch G1, return and pass the thread back through the hook... return to fetch G1...

- You need to make 5 loops between hook 1 and G1.
- Once the 5 loops are done, we continue and fetch G2 from hook 1.
- Warning: the coil must then be passed inside the previous loops! And at each step. This is what will hold the whole thing together.


- Then we'll make 2 loops between G2 and G3
- Then, a loop between G3 and D3, passing through the swivel-staple left open. This gives this:

- And we up: 2 loops between D3 and D2, 3 loops between D2 and D1, 5 loops between D1 and hook 2.
Little tip:
After each first pass through the previous loop, I pull the connection out of the trunnion. I pull the wire a little to get good tension. I find that the final result is better this way, but it's a little less simple to pass the spool back inside the previous loop.

3/ Wrap
- I pass the open paperclip through the large multi-strand loop at one of the two hooks.

I pull the loops out of the hook, still taut. And I thread the paperclip into my drill (with the wound end of painter's tape in the chuck, to prevent the paperclip from spinning on itself in the chuck)

And here we unroll this side, while remaining taut, and to align the two halves. Don't forget to pull the thread out of the staple.
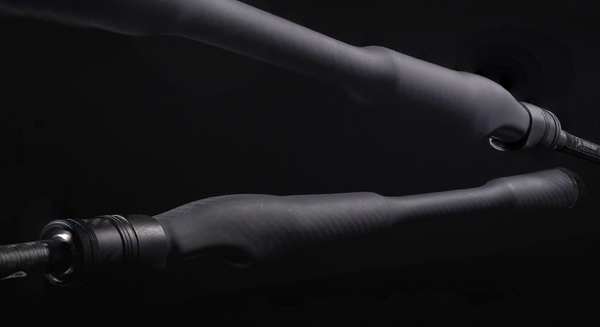
The whole thing is turned with a drill. We have to try to tighten the nylon strands in between, so we turn for a while. The longer the leader, the longer you have to turn. The idea is to be as tight as possible, as shown in the photo below. But be careful not to over-tighten either, otherwise it breaks, and you can start all over again.

<4/ Counterwinding
- Pass this twisted set in the staple
- All the while keeping tension as much as possible (a little release of tension and the wire itself, hence my two side hooks to separate the two strands), it's time to go two strands), it's time to fetch the other end
- CHANGE THE DIRECTION OF ROTATION of the drill .
- And wind again...
- This winding then counter-winding will "cancel each other out"
NB: the should be half as long as the time it takes to wind it up. required to wind
NB3: I hook a lead to the paperclip, hang the whole thing high by the the staple swivel. As the lead swings, it readjusts the counter-winding counter-winding. Ideally, you should count the number of turns... Example: 1000 turns of winding, 500 turns of counter-winding... I prefer lead and gravity to gravity finalize the right balance between windings and counter-windings...
5/ Finalization:
I finalize with a shorb loop at both ends.
Explanations for making a shorb loop... :
6/ Result:
In order to write this tutorial, a furled leader was made. Once again, the trunnions were placed by "feel", by eye. Measurements taken a posteriori give the following spacings:

Please note the of the diameter of this leader. Following a system of 5 - 3 - 2 - 1 system, we go from 11 sections to 9 sections, then 7, 6, 5, 4 and finally 3 sections. strands. The connections between each section are very discreet, much more so than a knot. than a knot.

Addendum:
Generally, furled leaders are made on a basis of 5 - 3 - 1 loops... After many trials with different combinations, I ended up adopting the 5 - 3 - 2 - 1 I've described here. Indeed, the change from 3 to 1 creates a visual break on the finished leader (but it fishes very well in 5-3-1).
In the example example, the inter-twine distances add up to 315 cm. The final leader, with shorb-loops, is 279 cm.
Overall length overall: as you can see, the length of the leader will depend on the the length of the boards. Be careful, though: you lose around 10% of length twisting... So if you take a 3-meter plank, you're likely to end up with a leader likely to end up with a finished leader 2.70 meters long. meters.
In the example used for this tutorial, this was a "long" furled line, designed for Grayling fishing with a long leader... In my experience, the most versatile furled (and the one I'd recommend for a fly fisher who doesn't yet have a great deal of experience with long leaders, i.e. over 4.5 meters), is around 7 feet (2.10m). It's also my all-purpose length of choice, for both prospecting and Sight nymphing. To do this, you need to allow for about 2.30m - 2.35m of working length, between hooks and swivel. We can then consider something like 40 - 35 - 35 - 30 - 30 - 30 - 35 cm spacing. I confess that I don't measure, and I make a distribution of swivels that seems homogeneous "to the eye".
In fishing, on a such a leader made of 0.10 mm diameter line, I connect (loop in loop) about loop) about 50 cm of 0.16 mm, 30 cm of 0.14 mm, 120 cm of 0.12 mm (tip).


Comments
4Je fais mes furled avec un 0,10mm (indiqué dans le texte). Quant à la marque, peu importe… j’ai fait celui-ci avec du nylon teinté bleu principalement pour les besoins de photos. La résistance est là, même avec un 0,10mm, car multipliée par le nombre de brins (je n’en ai jamais cassé aucun).
bonsoir,il manque pour que j’essaye un élément qui me semble primordial, quel nylon est de quel diametre avons nous besoin svp?
Et en vidéo, procédé légèrement différent, mais c’est le même principe:
https://www.youtube.com/watch?v=qSl0lRI2rLk
(crédit: Nicolas Flour, ProStaff RodHouse)
Genialissime!! Merci ?
Log in to leave a comment.
Log in